Sunday, January 20, 2013

Tiny-Lena Butterfly - Make It Crafty

 Good Morning!  Rhea here bringing you a little inspiration.  Today is a Make "it" Crafty Sunshine, Beach & BBQ's and I am here to bring you a little sunshine with Tiny-Lena Butterfly.  Living in Phoenix, Arizona USA we have lots and lots of sunshine so this was an easy project :)


I enjoyed coloring her so much with the flow of her dress and the butterflies.  I must admit I struggled with her hair a bit and the photograph made it look even worse...oh my!  I did just a touch of airbrushing on the background and alcohol blending around the image and then textured with a rag.

Here is a front view....


First I started with my background after I was happy with the colors I used a piece of burlap and blending solution and laid it over the parts of the color I wanted to remove.  This gave my texture.

For my colors I used....

Hair  E59, E57, E35, E31
Skin - E50, 51, 53
Dress - BG11, 72, 75, 78  V99, 95, 93, 91
Yellows used Y15, y02, Y11

I will be back with Make "it" Crafty on February 8th for our next blog hop!!!!  Can't tell you what we are doing yet so stayed tuned :)

Thanks for stopping by today!  I would love to read your comments and would be tickled R81, 83 and 85 (my favorite pinks) if you became a follower of my blog!!!!!  Hugs, Rhea

Friday, January 18, 2013


Happy Birthday Dustin Pike!!!!

How fitting that Dustin would release a bunch of monkey's for his birthday!  Yup, that's right, there is no monkeying around with this awesome collection.  They are a must see and have...LOL.  There are 6 in the collection and each one is a crack up.

Here is a barrel of monkey's.  I don't have the link yet but if you go to Dragon Doodles Studios and search it will be in the store today.  


Colors used were
R 20's
Y19, Y08, YR24
B21, 24, 23, 26
E 59, 57, 35, 31

Well dag nab it...I forgot to color the blue monkey's nose!!!!!!!  LOL.  don't you just hate that, you get done and hand it over and bam you see a big mistake.  Oh wait, He has a white nose! Yeah, that's it, a white nose.  Wheeew, I thought I made a mistake there for a minute. giggle.

Thanks so much for stopping by today, I would love to read your thoughts and even more would love it if you would become a follower of my blog!  I would be as excited as this barrel of monkey's!!!  Hug's Rhea

Wednesday, January 16, 2013

Tutu Toad and Sir Toad in a Garden Book


Yes, it is time for a new challenge at..

Your mission should you choose to accept it is...
Use Something New
&
Something Old From Your Stash

So, here we go with another fun filled two weeks!  Be sure to play along for your chance to win a $20 gift certificate to the store.   Make sure to hop on over to the Challenge Blog and check out the rules and get even more inspiration from our team. 

This was project took about 15 hours and was a labor of love!  It is my first altered book and now I am hooked.  I really had no plan of attack or details on what I was going to do just an idea that evolved into this.  Which honestly is the way all of my designs are.  I have a stamp or a die and that's it.  I sit at my desk and dive in and see what happens.

I had My new Floral stamps from Stampendous and my Something Old was my Book........

Now, let's get started on this big project :)

Garden Book by; Passionate Paper Creations

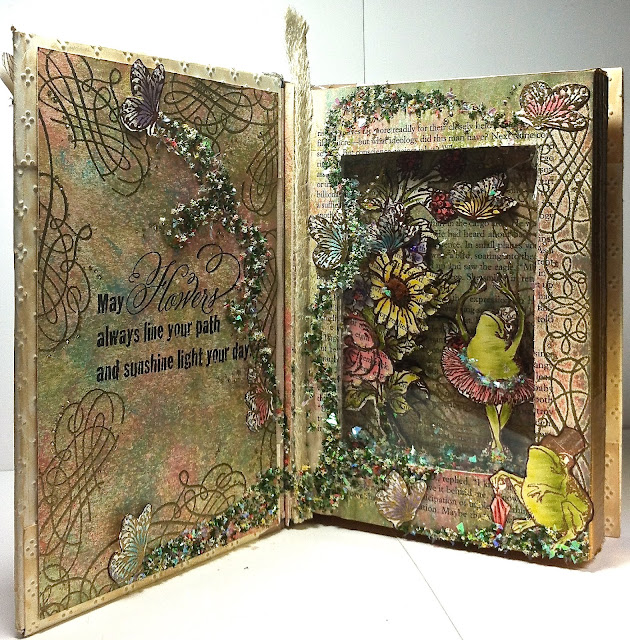
Garden Book by:Passionate Paper Creations


Here are a few step out photo's to help....  SORRY, SOME ARE BLURY

  Carve out the center of the book about an inch


 Emboss a piece of card stock with an extra large embossing folder from Spellbinders.  They are awesome!!!  They will emboss an 8 1/2" x 11".... seriously  You will need to do 2

 
Now cover the front of the book and glue into place...I used Beacon's Zip Dry. Here is what the inside cover looks like.  Make sure not to put any paper on the bend of the spine.  Do the back the same.  When you are done then cover spine with duct tape.


 Now it's time to get messy.  With a brayer and the 3 shown on the right picture start working color into the first page not "cut out".  No pattern just add color

 Stamp and emboss your swirls with pirate gold.  Make sure to move your swirls to the inside so you will see them because the edges are hidden by the frame of the other pages.

 Repeat the same process on the cover of the cut out pages. Set the book aside.
From the back of the book cut out about 10 pages and attach to card stock.  Stamp the jumbo spring bouquet with clear bark.  You will need about 6 of these.  You will also need lots of the little butterflies some embossed with clear bark and some in gold.

 With the colors showing I chalked the images with eye shadow applicators and coloring nibs by ranger. This takes lots of practice but is quick and lots of fun when you get the hang of it.  When you are all done.  You will need to cut everything out...yes everything.  It's time to start piecing them to the project.

 Start layering the bouquet into the inside pages of the book.  make sure to have several pages in between to give dimension. Then add a mix of matching flower soft for the grass with a little shaved ice.  A little stickles for more sparkle.  Make sure your details are perfect and just they way you want them before we seal her behind the window.  And make sure they are dry.
when you are happy with your results.  Duct tape the edges of the pages in the book or you can heavily emboss with aged gold.  oh,  Do not include your first couple of pages to your book.  Once you've secured you pages now you can add your window.  I used an acetate piece from a stamp package.
Using your brayer and the same technique as above do the inside front and back covers

with antique linen ink the front and back cover of your book

stamp and emboss swirls with gold and piece and attach your bouquet.  

Stamp and emboss swirls to the inside front cover with Flower Path sentiment
Garden book by: Passionate Paper Creations
Now add all your  details.  Use Stickles and flower soft with shaved ice.

I hope you enjoyed this book and are inspired!  Would love to hear your comments and would also love to have you as a follower!!  

Friday, January 11, 2013

This Year Is Going To Rock


Hello!  A couple of exciting things to share today.  First is announcing that I have been accepted as an Inspiration Designer for Make It Crafty!  I am so excited to be a part of this coloring team I can't even put it in words.   Second, is to share my first project with and join in on Make It Crafty's first blog hop of 2013.  

The theme is New Beginnings and there are 3 gift certificates hiding with the team.  So make sure to hop along because you could win if you leave a comment!

Elven-Hestia - Make It Crafty
Here I have used Elven-Hestia she does have a bit of an attitude but she is all girl!  The elements are from We Are Memories and Stampendous Fragments.
Copic Colors used
Warm Grays 01, 03, 07, 09
BV 20, 23, 25, 29

Thanks for visiting today and I can't wait to read your comments.  I would also love to have you follow my blog!  Hugs, Rhea

Now Time to hop on over to the other team members and don't for get to visit Make It Crafty for some really amazing digital images.

Zoe
Viv
Kat

Wednesday, January 9, 2013

Hydrangea & Flutters


Good Morning!  Rhea here again on this Wednesday to bring you another design for 7 Kids College Fund.  Today I am sharing a wonderful product I found from Beacon called Fast Finish Decoupage.  .  I have to say, I've never been a fan of decoupaging of any kind.  But Fast Finish has changed my mind.  It's a very thin liquid and dries so quickly and it is extremely easy to work with.

My favorite part was after dry brushing the images with distressed ink I applied the fast finish.  Well, guess what?!  The liquid mixing with the distress ink blended the colors just SLIGHTLY.  In person the canvas looks like it was digital image.  It is way cool!!!!

This project is an 8x10 canvas.  I covered it with Core'dinations card stock in green and added another piece to create a mat for the picture.  To adhere the paper to the canvas I brushed on the Fast Finish to the canvas, the back of the paper and again to the front.  I did this to each piece.


  • The picture is stamped with Hydrangea Bunch.  
  • With Distress Inks and Inking Tool work color into the background until you have the desired look
    • I used; mowed lawn, vintage photo, salty ocean, gathered twig
      • only a little bit of salty ocean
      • it's ok if you go into the flowers with the background colors
  • For the flowers use an eye shadow applicator and chalk colors
    • I used; picked raspberry, mustard seed, salty ocean, dusty concord, 
  • Now that the flowers are done use an eye shadow applicator with gathered twig and chalk shadows around the flowers.
  • Stamp Jumbo Butterflies - 2 each
    • Chalk from center out
    • set aside
  • Stamp swirl from Jumbo Peony into the background
  • Now with Fast Finish brush the back generously and attach to canvas.  Now, brush Fast Finish over the front covering the edges.  Only use one coat.  
    • I loved how the Fast Finish worked all the colors of the distressed inks together and really softened the overall look of this project.
    • By using only one coat it will have a soft matte 
    • The more coats used the shinier the project will be. 
  • Attach butterflies and bend their wings to give them depth.

Thanks for visiting today!  Don't forget, leave a little comment to let me know what you thought of todays project.  Also, I would love to have you follow my blog!!!  Hugs, Rhea

Let's Go Shopping!!!!
Hydrangea Bunch
Jumbo Butterflies
Fast Finish Decoupage
Distress Inks
Memento Ink Pad
ATG Tape Glider
Craft Nibbs
Blending Tool